
Labels & provenance
This is the heart of Graphium. By splitting what you did into steps and marking the inputs, tools, parameters, and outputs inside them, you turn an ordinary note into a machine-readable record of how a result came to be — a provenance graph built on the W3C PROV-DM standard. This page covers step blocks, the labels, the graph they produce, standards export, derived notes, and the bigger graph views that connect notes together.
The philosophy fits in two lines:
- Steps and labels are always optional. A note without a single one is a perfectly good note — see Notes & editor for everyday writing.
- The graph only shows what you chose to mark. Nothing is inferred behind your back — every node traces back to something you marked.
Step blocks Added in v0.23.0 (2026-07-28)
A step block is the editor's only container: it holds the text, tables, and images that belong to one action, and each step becomes an Activity in the graph. Insert one from the slash menu (Step, in the Advanced group). New steps are titled Step 1, Step 2, … automatically, and the title is the activity's name.
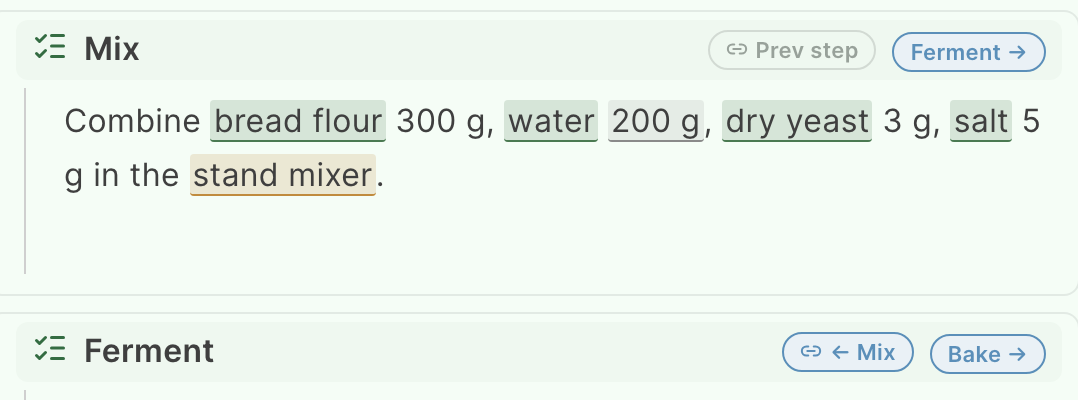
The Prev step chip in the header links this step to the one it follows. It lists Steps first; selecting a step with outputs opens its Outputs in a column to the right. Choose from another note Added in v0.42.0 (2026-08-24) works the same way: search for a note, then each selection adds the next Note → Step → Output column on the right so the item's location stays visible. Picking an output adds a row to the step's input table (creating the table if the step has none). The row's name becomes a blue link — the same look as @-note links — and opens the source note alongside the current one (it turns red if the reference breaks). The source output's attributes (temperature, etc.) are copied as columns at the moment of picking; you can edit them freely in this note without touching the source. The source's current values stay visible read-only in the step flow's table panel, labelled "From source". The step flow also shows the source step as a one-level Other note node connected to the current input by a dashed edge. Choose Without a specific output when you only mean "this came after that". Loops are refused ("Blocked: this would create a cycle").

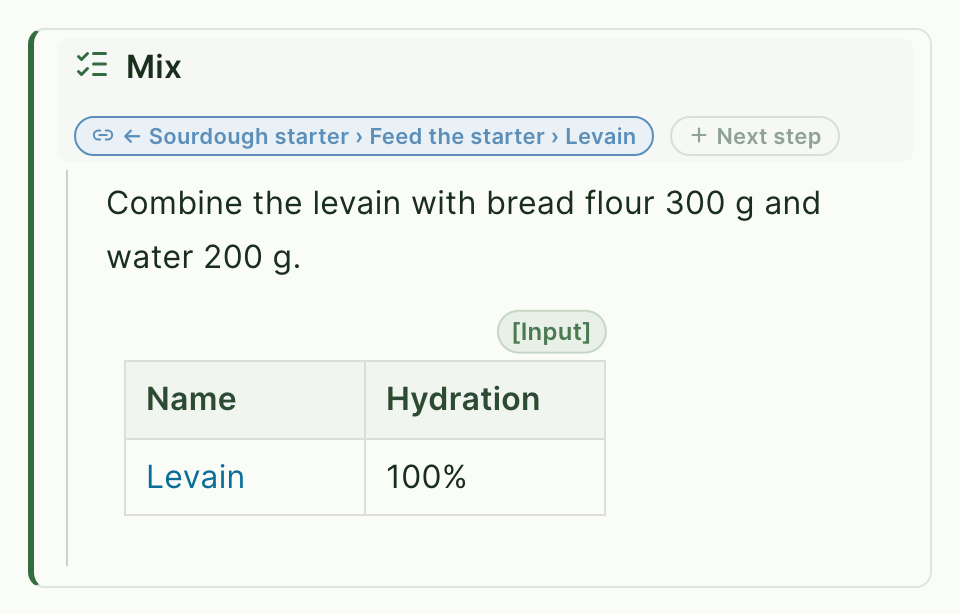
The Next step chip at the bottom jumps ahead: with no successor it creates one (Create new) pre-linked to the current step; with successors it opens a picker to link, unlink, or add.
Chaining steps gives you the run order for free — that order becomes the arrows in the graph. Because a label needs a step to attach to, the labeling UI below only appears while your cursor is inside one. Outside of steps, Graphium stays a plain, quiet editor.
Inheriting from past steps Added in v0.40.0 (2026-08-20)
Write the same operation often enough and you end up recalling the same conditions from scratch — what you recorded for a sintering run three months ago, or what you even called that step. The icon on the left of a step is the way back to it.
Pressing it lists the step names you have written before. Picking one fills in the step title, then offers what that step recorded.
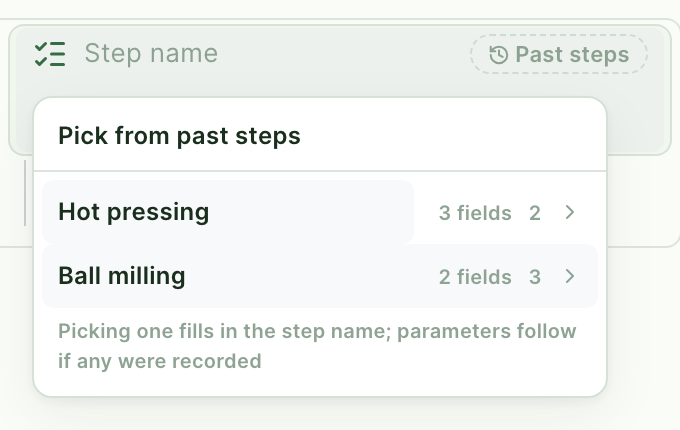
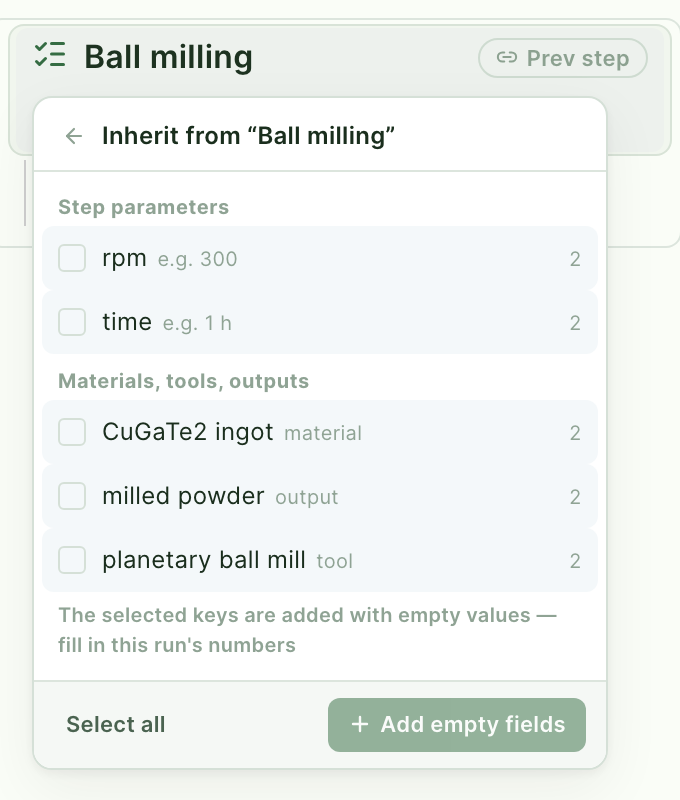
Picking one moves to the second stage, which offers what can be carried over.
- Steps with nothing to carry over stay in the list. Seeing "放電プラズマ焼結" before you type "SPS" is what keeps one operation from splitting into two names — a name that differs by a character is a different step from then on.
- The second stage separates parameters written on the step itself from the materials, tools and outputs it used or produced. The separation matters: if "pressure 100 MPa" was written on the powder going in, it comes back on the powder. Flattening it into the step's own conditions would leave two records of the same experiment no longer lining up.
- What you pick arrives empty. Past values appear only as small greyed examples to jog memory; they are never written into the cells. A number left over from last time reads as this run's condition.
- It is written into tables: parameters become columns of the step's parameter table, and a material or tool becomes a row in that kind's table, with its attributes as columns.
The picker appears only once you have written steps before. While a step is still unnamed, an outlined Past steps chip sits next to the icon as well, and disappears once you start typing.
Inline labels
Select a span of text inside a step's body and a second row appears on the formatting toolbar with four label buttons. Each button carries its keyboard shortcut as a small keycap.
| Label | What it marks | Shortcut |
|---|---|---|
| Input | Something the step consumed — a sample, a dataset, a reagent | ⌘⇧I (Ctrl+Shift+I on Windows/Linux) |
| Tool | The instrument or software used | ⌘⇧E (Ctrl+Shift+E) |
| Parameter | A setting or condition — temperature, duration, concentration | ⌘⇧P (Ctrl+Shift+P) |
| Output | What the step produced | ⌘⇧O (Ctrl+Shift+O) |
(The Tool shortcut uses E — think equipment — because ⌘⇧T is taken by the browser.)

A few rules about where inline labels work:
- Step body only. Step titles name the activity itself, so they can't carry entity labels.
- Not inside table cells. To bring a table into the graph, label the whole table instead (see below).
- Removing is always allowed, even outside a step: select the highlighted text and click the same label button (or press its shortcut) again to toggle it off. You can also click the small label badge on a labeled block and choose Remove label.
Clicking an existing highlight opens a Link & merge popover, where you can merge two highlights that refer to the same thing or change which entity a highlight binds to. Most of the time you won't need it — the defaults do the right thing.
Labeling a whole media block
Images, videos, audio, files, and PDFs can carry a label as a whole block — "this photo is the output of this step." Click the media block to select it and the same four label buttons appear on its toolbar (without keycaps — the shortcuts apply to text selections only). The block becomes a single entity in the graph.
Context labels on tables and media
The drag handle (⠿) menu offers a Label submenu for tables and media blocks — the same four labels, applied at block level:
- On a table, the hint reads Each row → one Entity: every row becomes its own entity, which is why per-cell inline labels are unnecessary. The label shows as a small chip just above the table, aligned to its right edge — click it to change or remove it. Added in v0.28.0 (2026-08-04)
- On a media block, the hint reads Whole block = one Entity — equivalent to labeling it from the toolbar.
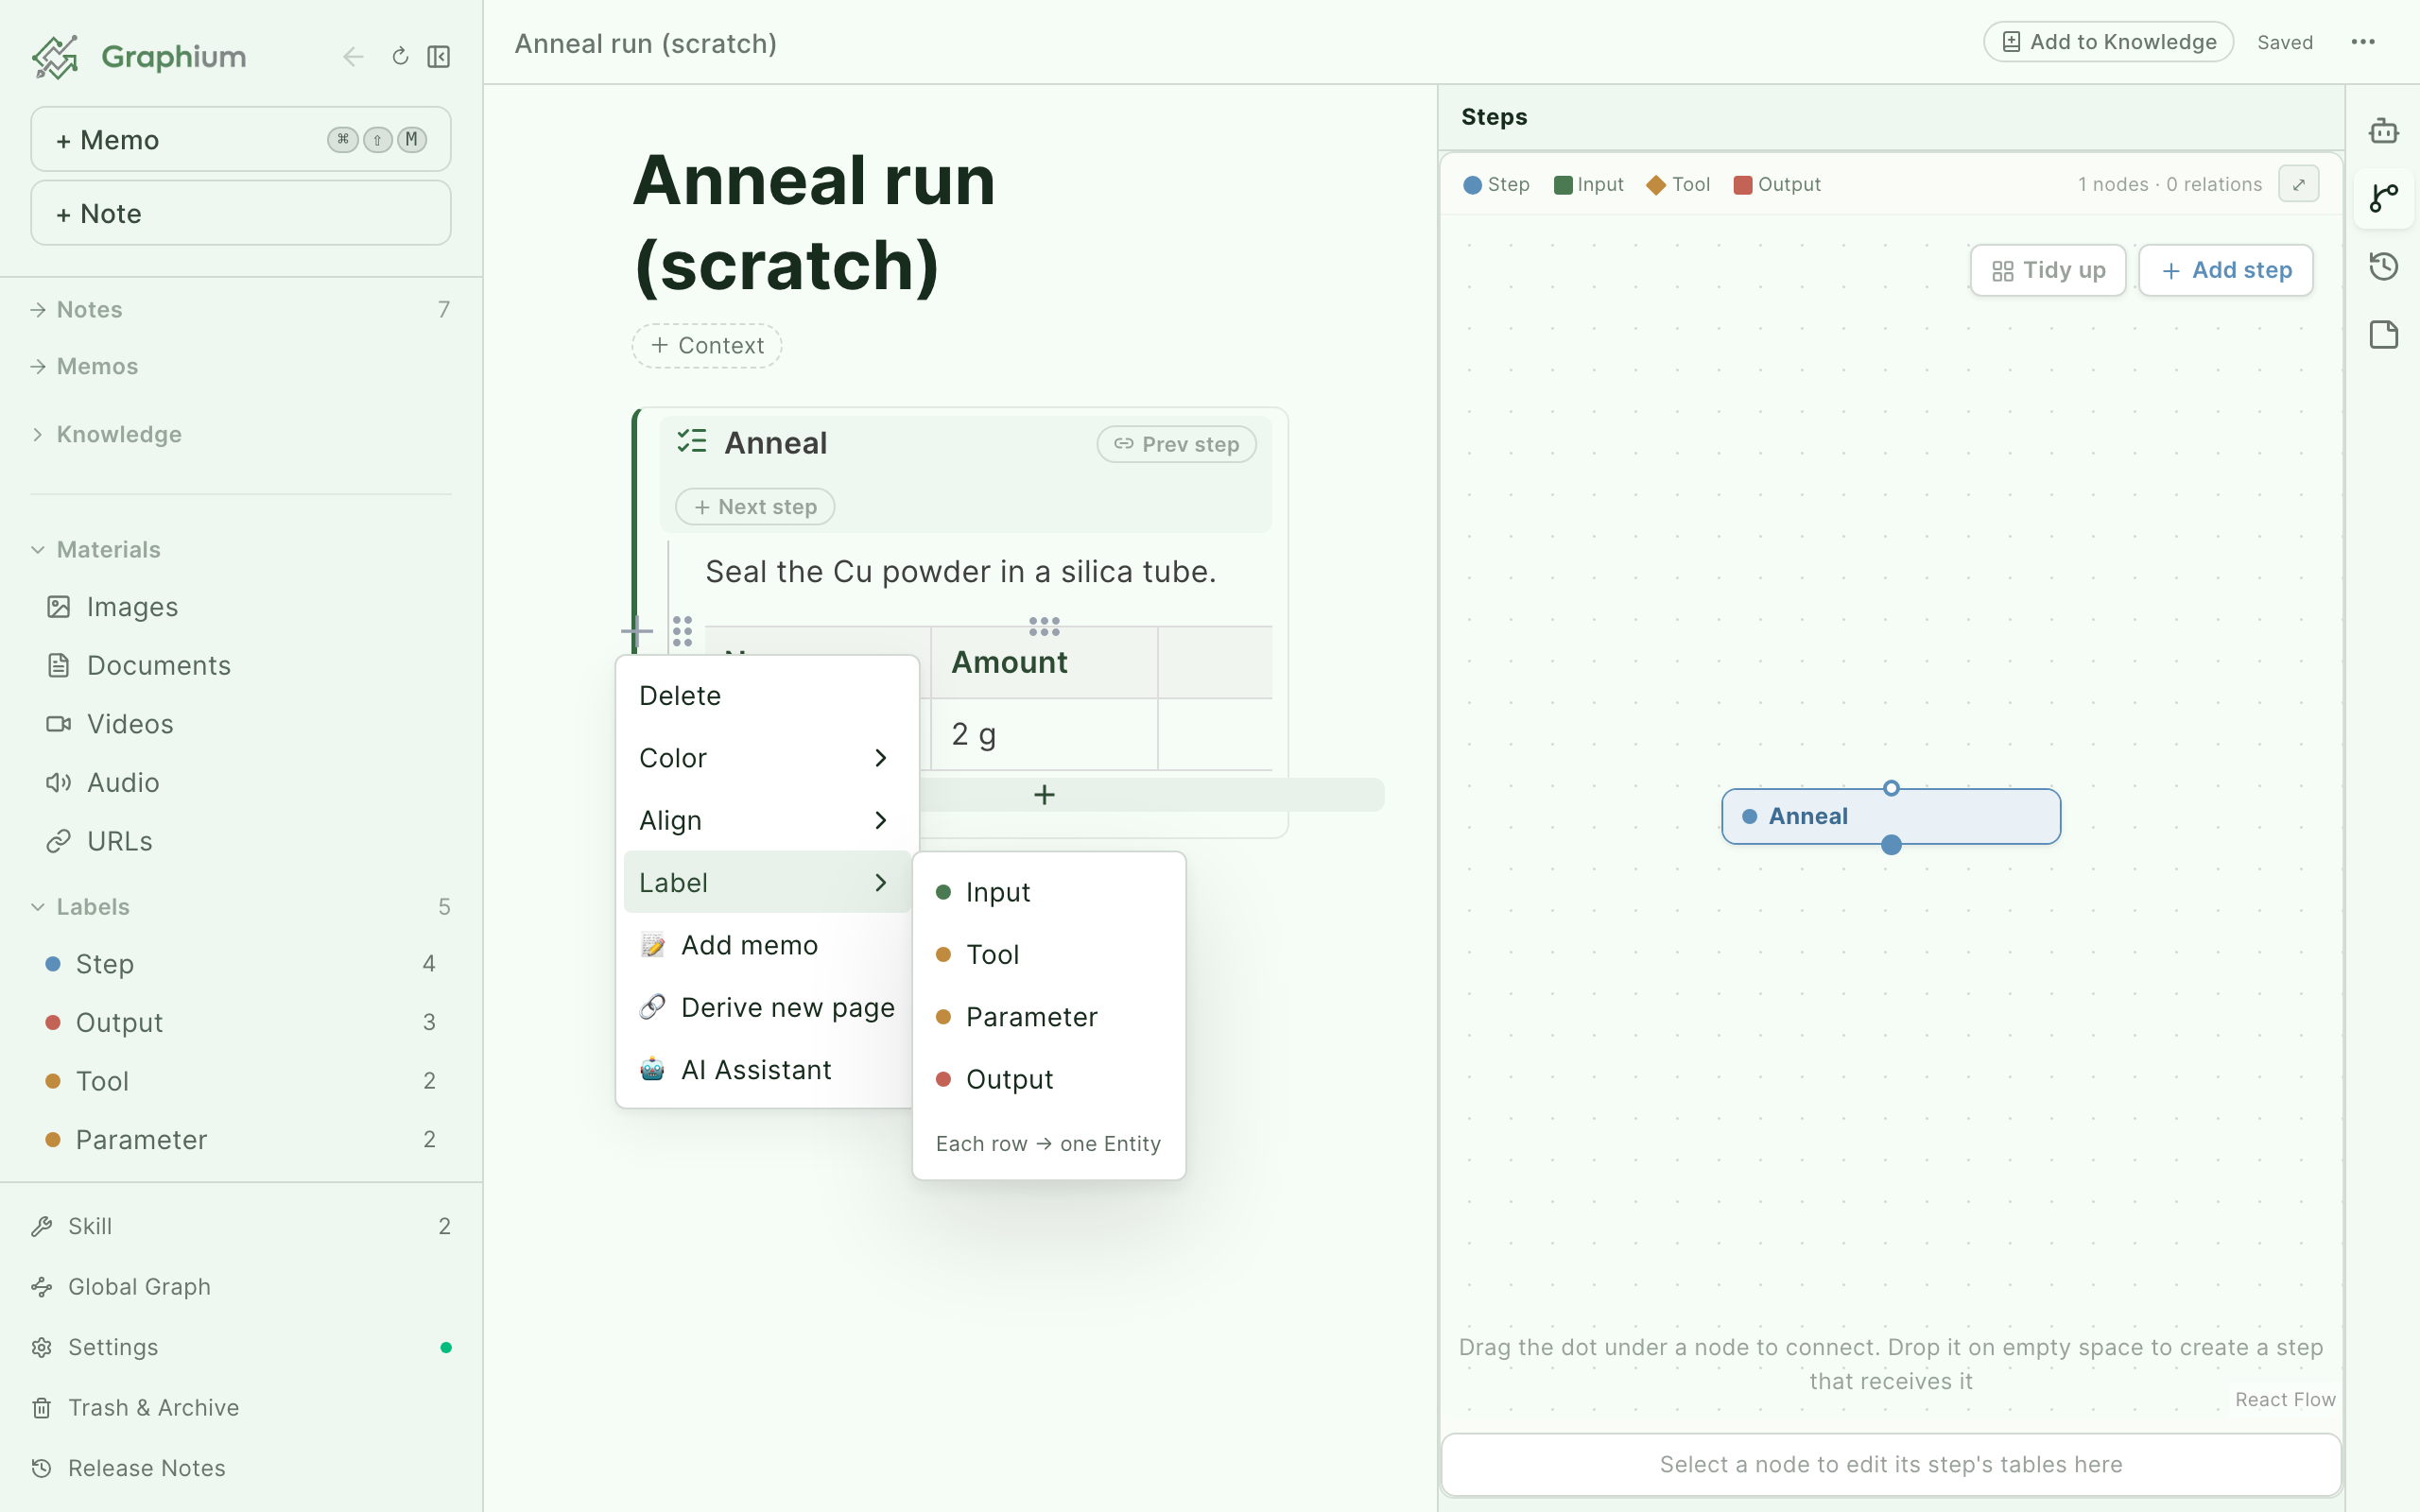
As with inline labels, new context labels can only be applied inside a step; existing ones can be changed or removed anywhere. Clicking a label in the menu again removes it.
Legacy heading labels
Older Graphium notes marked procedure steps by labeling headings with Step, Plan, or Result. Step blocks replaced that style, so there is no way to add these labels to a fresh heading — but headings that already carry one still show the Label submenu so you can change or remove them.
Renaming labels
If "Input / Tool / Parameter / Output" doesn't match your field's vocabulary, rename them: Settings → Display & Language → Provenance label names. Your custom names appear everywhere (toolbar, graph legend, badges), the underlying PROV-DM role stays standard, and Reset to defaults brings the originals back.
The provenance graph panel
Once a note has at least one step or label, a Steps tab appears in the right-hand panel. Open it and you'll see the provenance graph, which regenerates automatically about half a second after every edit — there is no "generate" button to press.
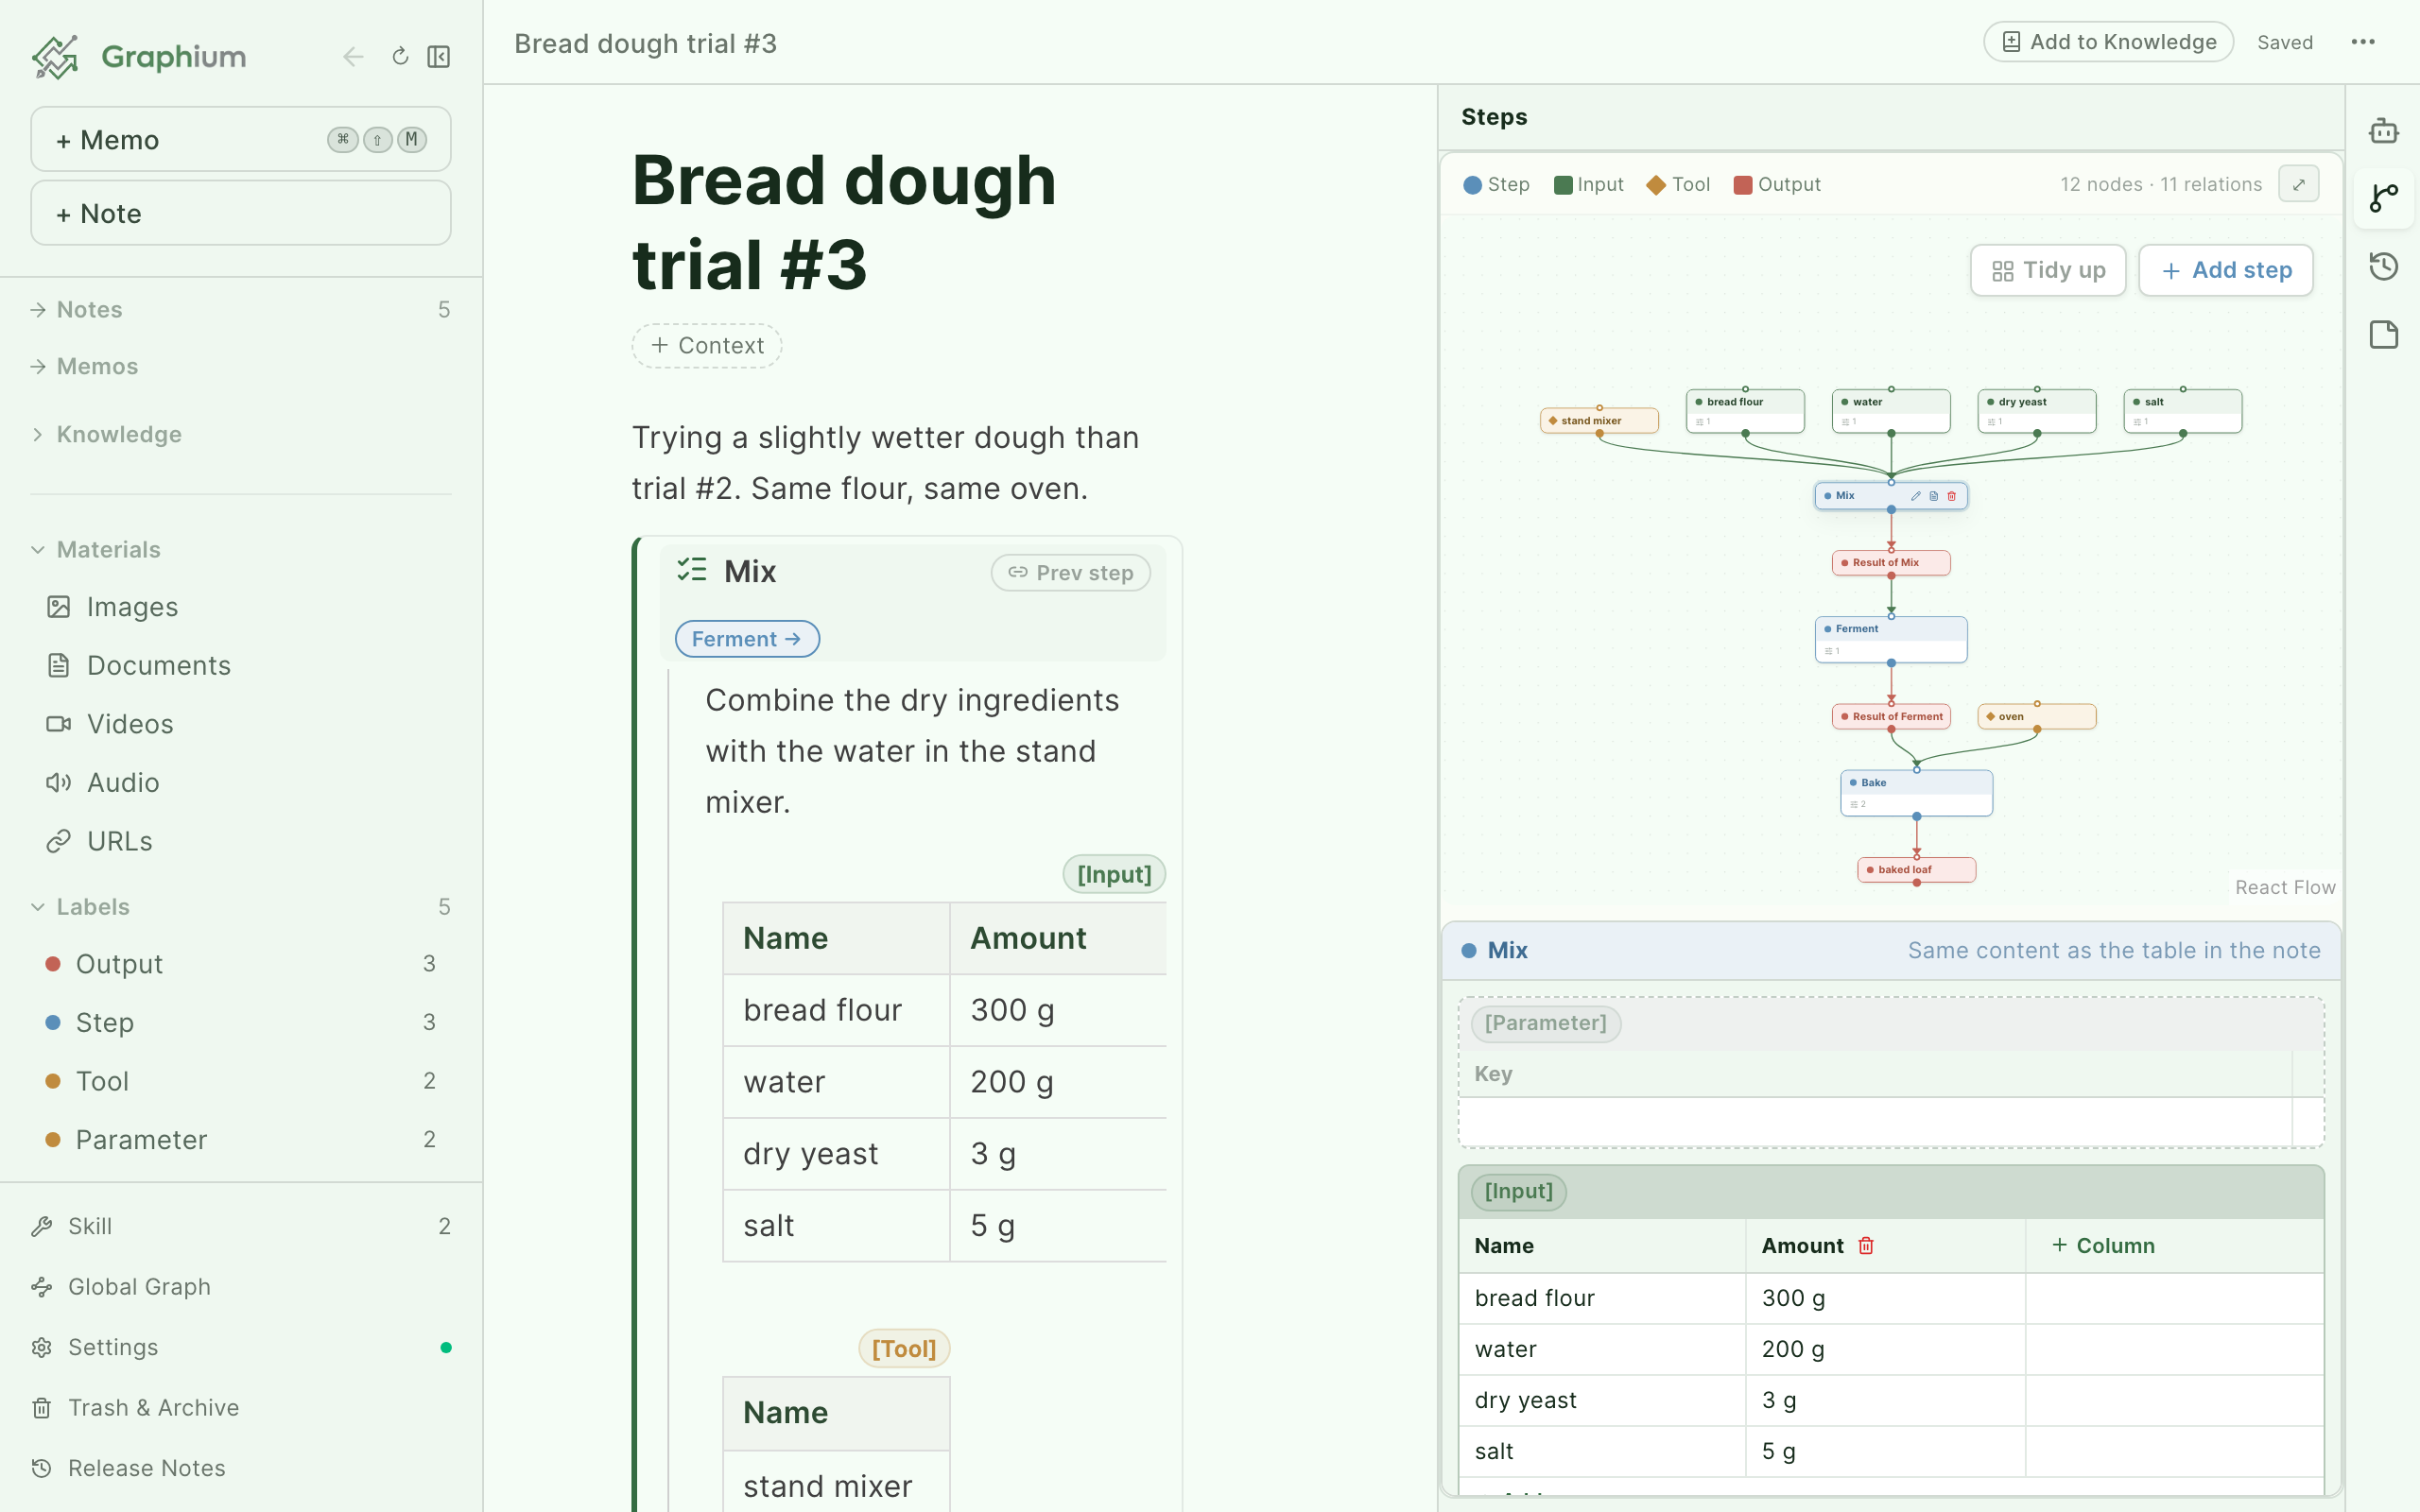
What you're looking at:
| Element | Meaning |
|---|---|
| Card with a blue band | A step (a PROV Activity). The card shows its name and how many parameters it has. When several steps share a name (parallel runs of one operation), the card also carries the parameters whose values differ between them |
| Colored node | An entity — Input (green), Tool (amber), Output (terracotta) |
| Panel below the graph | The selected step's tables — parameters, inputs, tools, outputs — editable here |
Green edge (used) | The step consumed this entity |
Terracotta edge (wasGeneratedBy) | This entity was produced by the step |
Dashed blue edge (wasInformedBy) | Order only: B came after A, but the note doesn't say which output was handed over |
Parameters in the top right expands every node to show its parameters and attributes in full. Keep it collapsed to follow the shape of the graph, expand it when you want to compare conditions. The choice is remembered.
The expand button (Expand view) opens the graph full-screen, still editable.
Repeated referents collapse into one node. If step B's Input text matches step A's Output text (and B is linked to A as its next step), Graphium unifies them: "the powder A produced" and "the powder B used" become a single entity, and the chain reads continuously across steps. This is also what keeps branches straight when a step has several outputs going to different steps.
Editing from the graph Added in v0.30.0 (2026-08-09)
The panel is a place to write, not just a picture to read. Everything you do here is written into the note — the graph holds no data of its own.
- Add step — the button in the top-right adds a step block to the note.
- Select a step card to rename it, jump to its text (Go to text), or delete it. A step with content asks for confirmation, telling you how many blocks go with it.
- Connect by dragging the dot under a node onto a step — the entity becomes that step's input. Drop it on empty canvas instead and a new step is created to receive it. Connecting two steps records order only (the dashed edge). Cycles are blocked.
The panel is the step's contents. Selecting a node — the step or any of its entities — opens the same panel below the graph (to the right when full-screen): the step's tables, one card per table, in the note's label colors. Selecting an entity just highlights its row. Each card is the table in your note — editing here and editing the table in the note are the same act. While nothing is selected the panel folds away to give the graph the room; the divider between them can be dragged to taste (double-click resets it).
| Section | Shape | To add |
|---|---|---|
| Parameter | one column per key, one row of values | Column adds a key |
| Input / Tool / Output | one row per entity, one column per attribute | Add row adds an entity |
A kind the step doesn't have yet still shows as a table — a dashed card with one empty row. Type into that first cell and the labeled table appears in the note with what you typed already in it (the key for a parameter table, the name for the others). Leave it alone and nothing is written, so a step never fills up with empty tables you didn't ask for.
Entities you highlighted in a sentence keep working as they are, and appear right inside their kind's table as grayed rows — highlighted parameters as grayed columns. Renaming one edits the text in place. Add to the table (or clicking its grayed cells) takes it in for real. The sentence is left exactly as it was, highlight and all — adding only adds. Its bound attributes come along as columns (they are values, and keeping them in both places would count the same fact twice), and the grayed row disappears because the highlight and the new row are the same entity. Highlighting and tables are the same data seen two ways, so you can move over at your own pace.
The same tool used in several steps is one entity. Write "mortar" as a tool in two steps and the graph draws one node with an edge to each — no duplicates. In the step whose table doesn't hold its row it shows grayed, labeled with where it lives (In <step>), and Add to the table gives this step its own row for it — still one entity in the graph, because same-named materials and tools merge.
Exporting PROV-JSON-LD
The note menu (the ⋯ button at the top right of the editor) includes PROV-JSON-LD. It downloads the current note's provenance graph as a .jsonld file following the W3C PROV-JSON-LD serialization — readable by standard provenance tools outside Graphium.
The export is scoped to the current note. It includes the labeled steps and entities, the note's edit-history agents (human and AI), and any Knowledge layer entries derived from the note. The menu item is disabled while the note has no provenance data.
The note's own history
Provenance has a second axis: not just "how was the result made," but "how was the note made." Every save is recorded with who made it — you or an AI — and you can pin versions on purpose. That side of provenance is part of everyday writing, so it lives in Notes & editor → History and versions.
Derived notes
When a new experiment builds on an old one, don't copy-paste — derive. The note menu (⋯) has Derive whole note, and the drag handle (⠿) menu has Derive new page for branching from a single block. The copy opens as a new note carrying a Derived note banner with a Source note link back to the original, and the derivation is recorded in both notes' histories and in the lineage graph.
Turning a URL, PDF, or Word file into a pre-labeled note
If the procedure already exists — a synthesis section of a paper, a protocol on the web — AI can do the labeling pass for you. In the sidebar's Materials section (your materials gallery), open the action menu on a URL, PDF, or Word material and choose Extract steps into a note. Select several materials and the same action appears as a bulk button.
Graphium reads the source, splits it into step blocks, applies Input / Tool / Parameter / Output highlights, links the steps in order, and records the source material in the note's lineage. A toast tracks progress, and the result is a normal note — review the labels and edit anything the AI got wrong. This requires a configured AI model.
Two habits keep the imported labels tidy. Step titles hold the operation only, and one run is one step — a source that mills for 0 h, 1 h and 3 h produces three steps all named "Ball milling", each with its own Parameter values and its own output. The graph fans out into one branch per sample and converges again at the measurement step, which is how a paper with several samples is recorded in a single note. The other habit: names already used elsewhere in your workspace are offered back to the AI, so the same mill comes back as the same tool instead of a near-duplicate.
Graph views beyond one note
Labels and links also feed graphs that span your whole workspace:
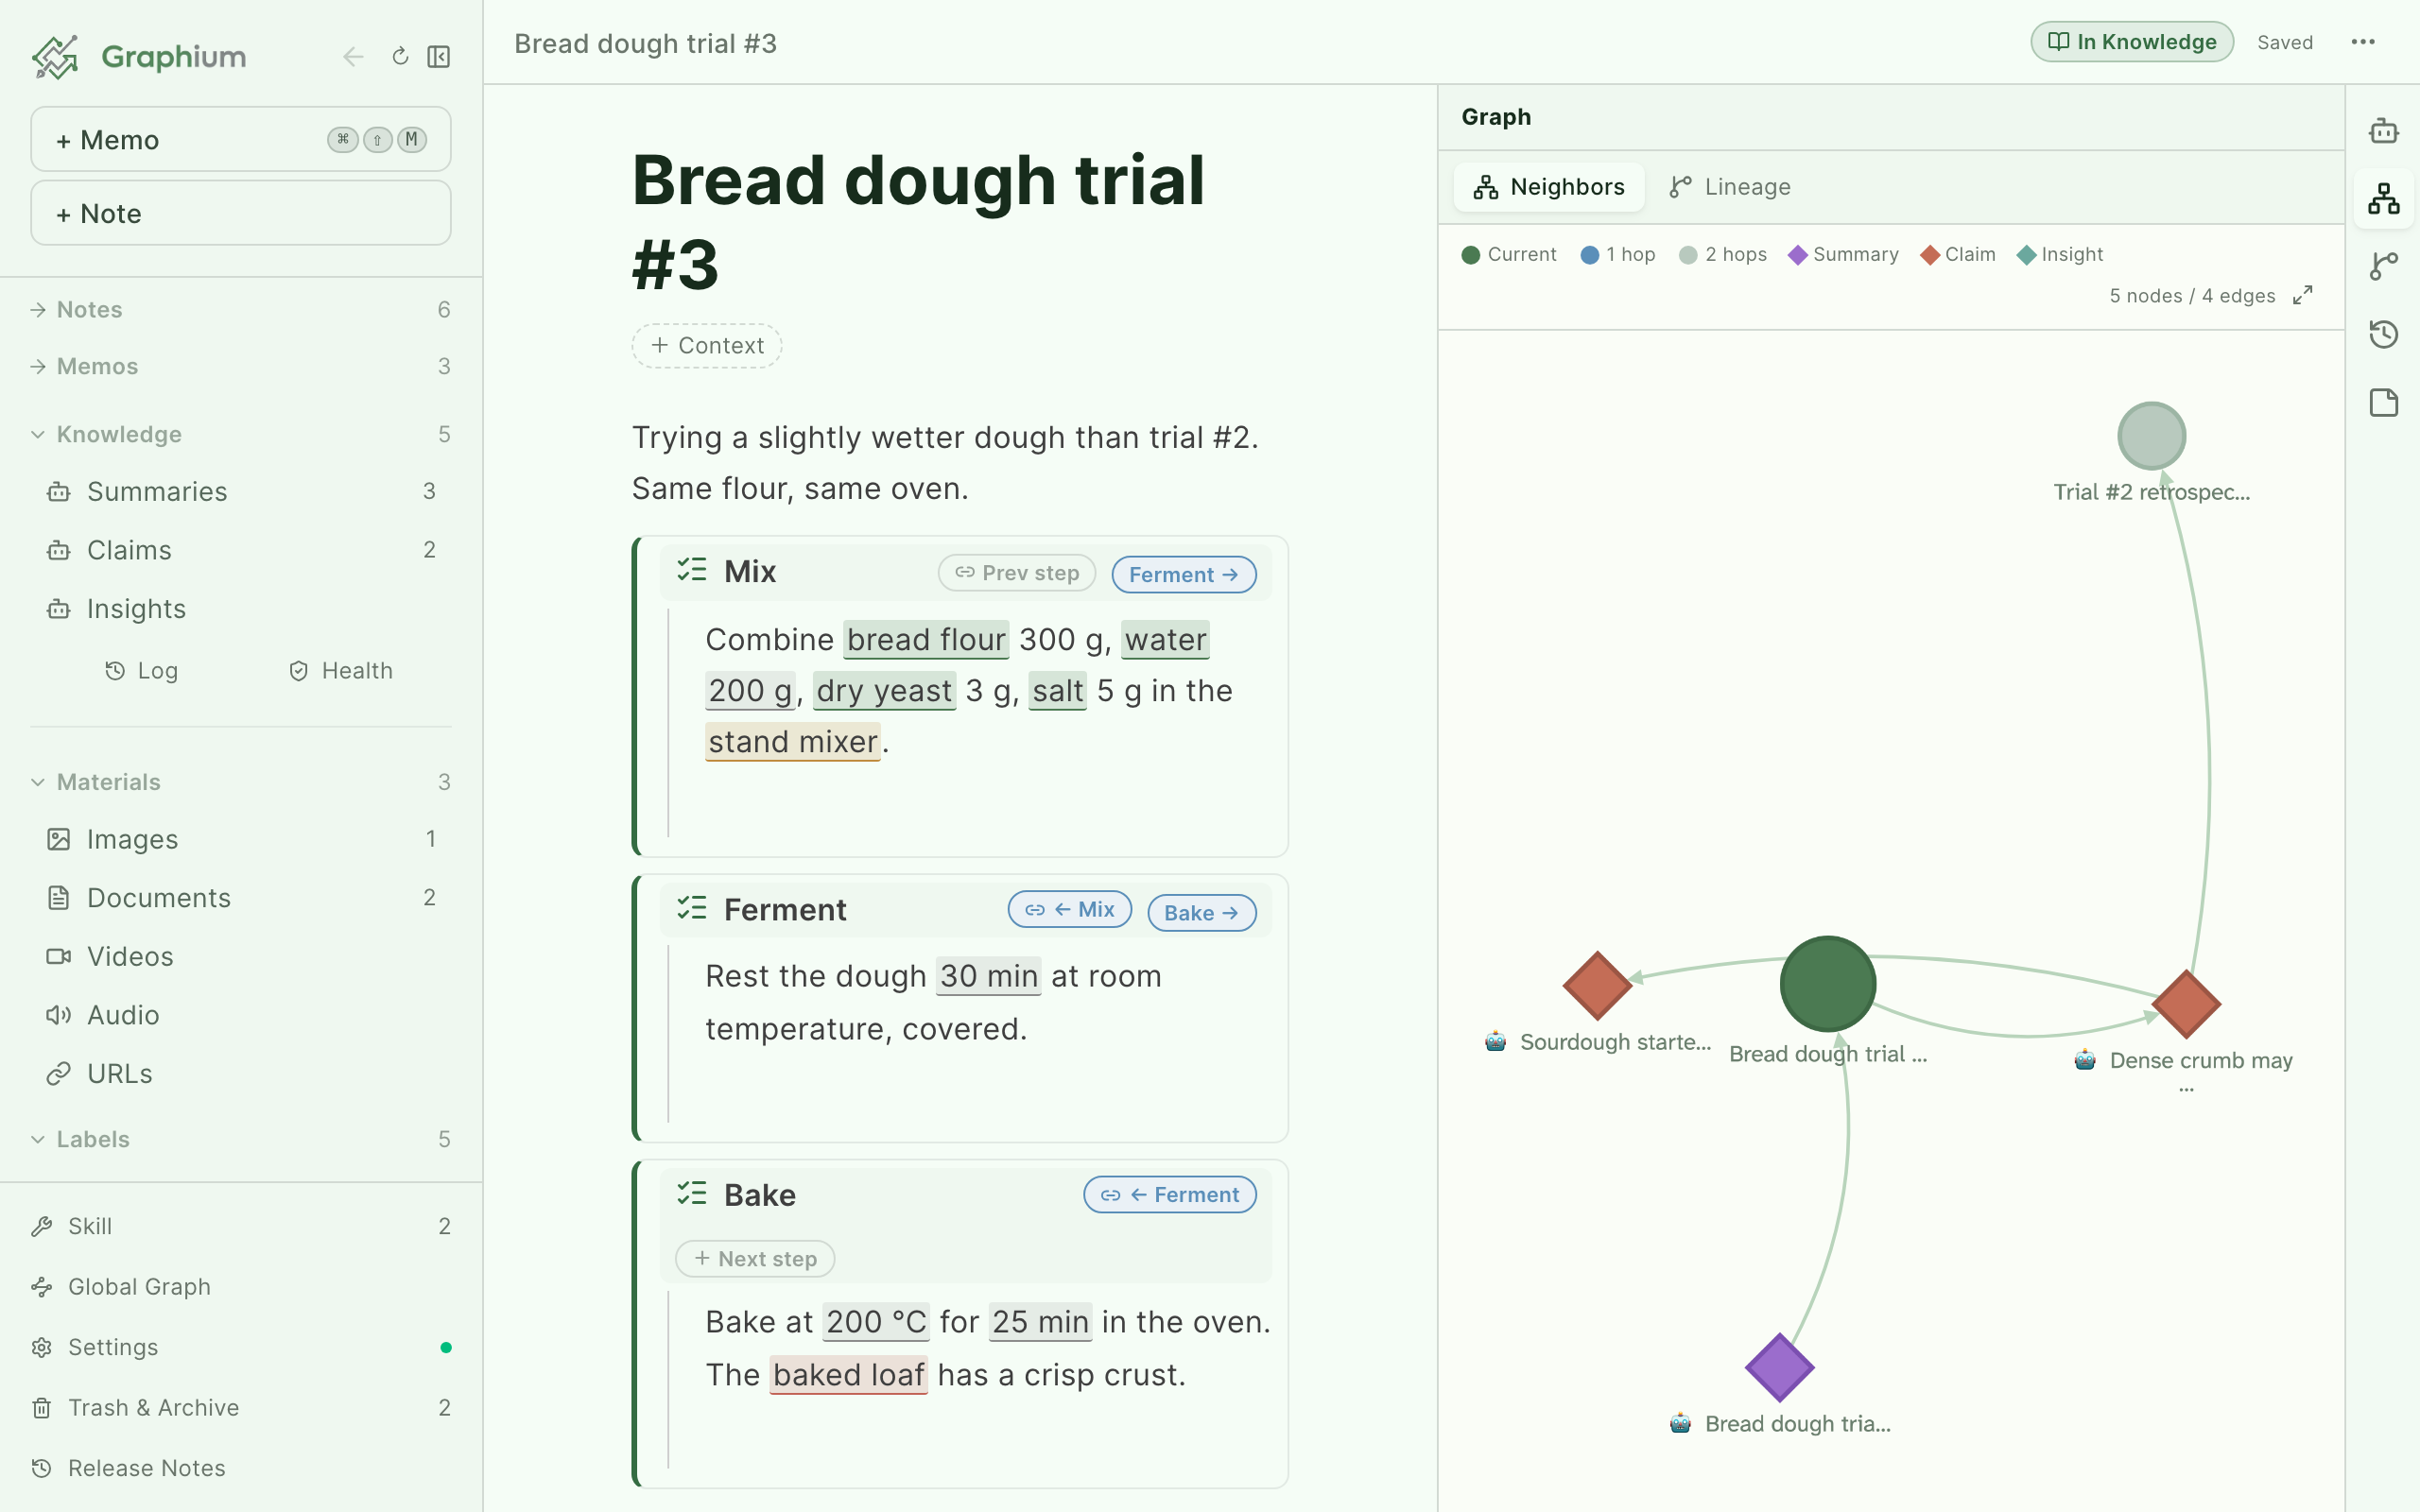
- Neighbors — in the right panel's Graph tab: the current note and everything linked within two hops.
- Lineage — the second sub-tab of Graph: a tree of the current note's upstream sources — the notes, materials, and versions it was derived from.
- Global Graph Added in v0.16.5 (2026-06-29) — in the sidebar: every note at once, layered as Sources, Notes, and Claim · Insight (Knowledge layer entries), with edges for Derived, Used, and Reference relations. Toggle Hide references or Show isolated, color nodes by type or context, and Group by context to pull related notes into clusters.
- Activity graph editor — the Steps (only) view described above, where the step order itself can be rewired by dragging.
- Process list — in the sidebar under Processes: the flow each note describes, listed side by side (see Process list below).
Arranging graphs by hand Added in v0.43.0 (2026-08-25)
Every graph lays itself out automatically — and until this version, kept doing so. Now the arrangement is yours to keep. This works the same way in every graph in the app: the Steps panel, the Graph tab, the Global Graph, and a material's graph.
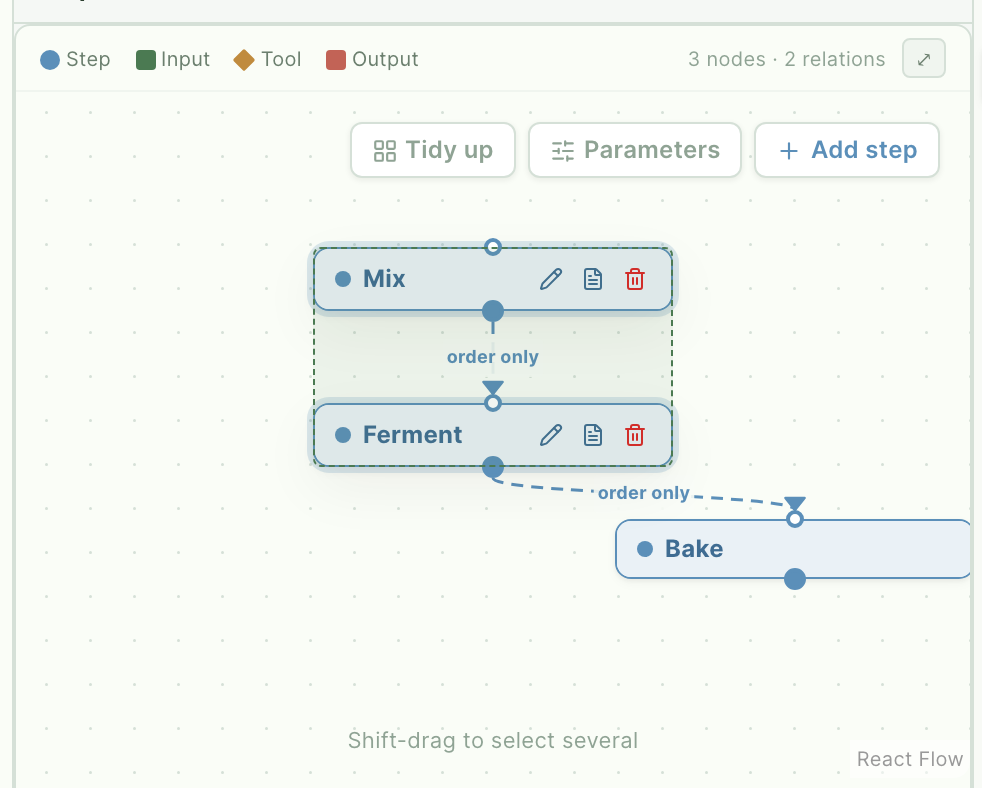
- Drag a node to move it. The arrangement is saved per graph and comes back when you return — on your other devices too, since it is stored with your workspace data. Notes themselves are untouched.
- Shift-drag the background to select a group. A dashed rectangle stays around the selection, and dragging any node inside it moves the whole subgraph together. A one-line hint under the graph teaches the gesture until the first time you use it.
- New nodes don't scramble your work. Once a graph is arranged by hand, automatic layout stays out of the way: a material or step added later is placed near the existing arrangement instead of everything being reshuffled.
- Back to automatic — the ↺ button in the graph's corner (in the Steps view, the existing Tidy up button) discards the saved arrangement and hands the graph back to the layout engine.
In the Steps view, grabbing the middle of a card moves it; the small ports at the card's edges still create connections, as before.
Process list Added in v0.40.0 (2026-08-20)
Processes in the sidebar lists the flow each note describes, side by side.
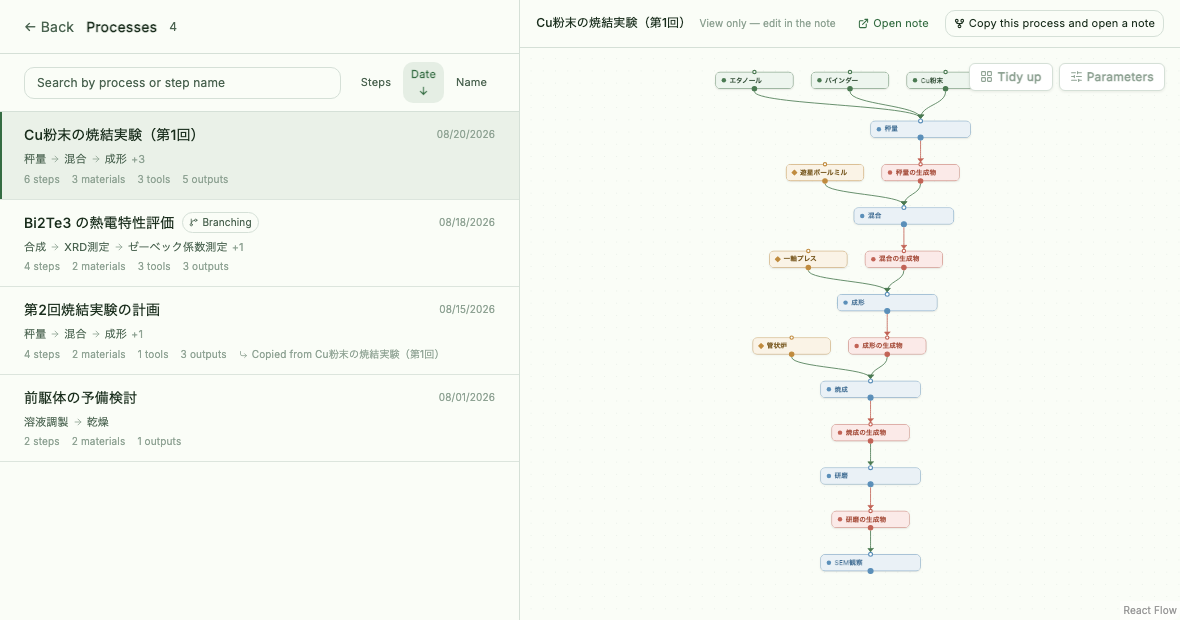
- A row leads with the flow rather than the title (Ball milling → Hot pressing), because what an experiment is comes across through its sequence long before its name does.
- Selecting a row draws that flow on the right — the same figure you see in the right panel with the note open.
- Search matches step names too, so "which notes did a sintering step" is findable without knowing what those notes were called.
- To use an existing process as the starting point for another run, select it and choose Copy this process and open a note Added in v0.41.0 (2026-08-21). Graphium copies the whole note, opens the copy, and records which note it came from. The original stays unchanged.
- A process cannot be edited directly here. It is derived from the note's text, so use Open note to change the original.
Together these answer the question labels exist for: not just "what did I write," but "where did this come from, and what did it lead to."